¿Está experimentando una reducción de la eficiencia de corte o una salida láser débil? Puede que haya llegado el momento de sustituir el tubo láser. Los tubos láser son componentes esenciales utilizados para cortar y grabar diversos materiales. Esta guía explica cómo identificar cuándo es necesario sustituir el tubo láser y ofrece un proceso de instalación paso a paso para que la máquina vuelva a ofrecer un rendimiento óptimo.
Principales conclusiones
- Reconocer los signos de avería de un tubo láser de CO2, como la disminución de la eficacia de corte y los daños físicos, es esencial para sustituirlo a tiempo.
- La selección de un tubo de recambio compatible implica comprobar las especificaciones del fabricante y asegurarse de que las dimensiones para la instalación son las adecuadas.
- La alineación y el mantenimiento adecuados del nuevo tubo láser son fundamentales para un rendimiento y una longevidad óptimos, incluidas las comprobaciones periódicas de fugas y la gestión del sistema de refrigeración.
Signos de que su tubo láser necesita ser sustituido
Para mantener la calidad de su trabajo es necesario saber cuándo es necesario sustituir el tubo láser. Una de las primeras señales son las dificultades para cortar materiales que antes eran fácilmente manejables. Un descenso significativo de la eficacia de corte del láser indica que el tubo está llegando al final de su vida útil.
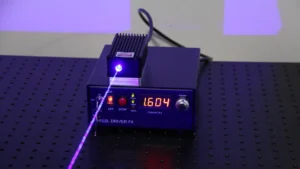
Un rayo láser débil o incoherente durante el funcionamiento puede afectar a la precisión de sus cortes y grabados. Los fallos de encendido frecuentes o un láser que no se enciende del todo son indicios claros de un tubo láser de CO2 defectuoso. Los tubos láser de CO2 suelen tener una vida útil de entre 1.000 y 2.000 horas, por lo que es esencial supervisarlos periódicamente.
La degradación de la calidad del grabado es otra señal de alarma. Si sus grabados carecen de la profundidad y claridad que tenían antes, el tubo podría ser el culpable. Además, los daños físicos visibles, como grietas o decoloración en el tubo láser, son una clara señal de que es necesario sustituirlo.
Cómo elegir el tubo láser de repuesto adecuado
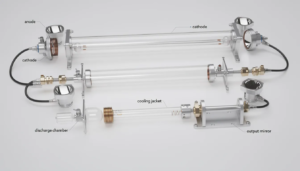
Para un funcionamiento perfecto de la máquina, seleccione el tubo láser de recambio adecuado. Empiece por comprobar las recomendaciones del fabricante sobre la compatibilidad del tubo con su modelo específico. Mida el espacio disponible en su máquina láser para asegurarse de que la longitud y el diámetro del nuevo tubo se ajustan correctamente.
Elija un tubo láser nuevo con un poste en forma de espárrago en ambos extremos para facilitar la soldadura de las conexiones. Tenga en cuenta lo siguiente al seleccionar su tubo láser:
- Busque postes en forma de espárrago en ambos extremos para facilitar la soldadura.
- Explore empresas como Cloudray, que ofrecen una gran variedad de tubos láser de CO2.
- Seleccione entre diferentes potencias y especificaciones para encontrar la que mejor se adapte a sus necesidades.
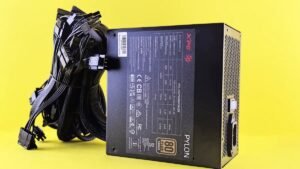
Muchos proveedores ofrecen paquetes que incluyen tubos láser y fuentes de alimentación compatibles, lo que supone un ahorro potencial.
Preparación para la sustitución del tubo láser
Reúna todas las herramientas esenciales antes de iniciar la sustitución. Estas herramientas incluyen:
- Cuchillo artesanal
- Soldador
- Destornilladores
- Pelacables
- Cortaalambres
Es posible que tenga que cortar el aislamiento, los tubos o los revestimientos para acceder al tubo antiguo y prepararlo para la instalación.
Estas herramientas facilitarán el proceso y le permitirán tener todo lo necesario al alcance de la mano.
Retire cualquier cinta aislante o sellador de silicona para acceder sin problemas a los puntos de soldadura al separar el tubo antiguo. Los tubos láser de CO2 antiguos están soldados en cada extremo a la fuente de alimentación. La preparación del nuevo tubo es igualmente importante. Envuelva alambre flexible alrededor de los postes para ayudar con el proceso de soldadura para una conexión segura.
Antes de instalar el nuevo tubo, conecte las tuberías de suministro de agua, lo que puede resultar más fácil si se calientan ligeramente. Asegure todas las conexiones de suministro de agua antes de probar la alineación para evitar fugas durante el funcionamiento.
Proceso de sustitución del tubo láser paso a paso
Empiece cortando tubo de silicona para cubrir las conexiones soldadas expuestas para mayor seguridad. Desuelde las conexiones en ambos extremos del tubo antiguo después de retirar cualquier material de recubrimiento como aislante o sellador. Los tubos de suministro de agua deben separarse del tubo láser antiguo durante la sustitución. Una vez calentada la soldadura, el extremo del tubo puede saltar al tirar suavemente de él para liberarlo.
Fije el nuevo tubo en sus clips dentro del chasis del láser. Utilice alambre adicional para mejorar la adherencia al soldar los cables de alimentación a los postes del tubo. Caliente los tubos de alimentación de silicona en agua caliente para facilitar la instalación en el nuevo tubo. Se recomienda utilizar tubos de silicona para cubrir las conexiones soldadas por seguridad después de la instalación. El tubo antiguo ha sido sustituido por el nuevo, listo para su alineación y comprobación.
Estos pasos garantizan que el nuevo tubo quede instalado de forma segura y listo para la alineación.
Alineación de su nuevo tubo láser

Después de instalar el nuevo tubo láser, alinéelo para obtener un rendimiento óptimo realineando los espejos para garantizar que el haz se dirige con precisión. Utilice tornillos de mariposa para ajustar los espejos, cambiando efectivamente el ángulo del haz para una mejor alineación. La alineación correcta de los espejos es crucial para evitar el desvanecimiento o el fallo prematuro del tubo láser.
Comience con la alineación de campo lejano para asegurarse de que el haz incide en los puntos correctos a ambas distancias. Compruebe la alineación vertical del haz pulsando el láser sobre un objetivo y ajustándolo hasta que el haz incida correctamente a varias alturas focales.
Realice una prueba a baja potencia para confirmar la alineación antes de realizar operaciones a alta potencia.
Pruebe su nuevo tubo láser
Pruebe el nuevo tubo haciendo funcionar la bomba de agua y comprobando que no haya fugas antes de proceder a la alineación. Realice una prueba de impulsos activando brevemente el láser mientras se asegura de que se cumplen las condiciones necesarias, como la refrigeración por agua. Inspeccione regularmente si hay fugas en el sistema de refrigeración, ya que incluso las fugas más pequeñas pueden afectar significativamente al rendimiento del tubo. Es importante llevar equipo de seguridad cuando se trabaja con láseres para evitar accidentes.
Mantenga un sistema de refrigeración adecuado para evitar el sobrecalentamiento, una de las principales causas de fallo prematuro del tubo láser. Utilice agua destilada o desionizada en el sistema de refrigeración para evitar la acumulación de minerales que pueden afectar a la eficacia de la refrigeración.
Guarde la máquina láser en un lugar fresco y seco para evitar daños en el tubo relacionados con la humedad.
Consejos de mantenimiento para tubos láser duraderos
Mantenga sus tubos láser para prolongar su vida útil y garantizar un rendimiento óptimo. Los sistemas de refrigeración mejorados son necesarios para que los tubos de mayor potencia gestionen el calor que producen durante el funcionamiento. Una refrigeración adecuada es fundamental para evitar dañar el tubo láser.
Siga estos consejos de mantenimiento para mantener sus tubos láser en excelentes condiciones, proporcionando un rendimiento constante y fiable durante mucho tiempo.
Dónde comprar tubos láser de calidad
Elegir proveedores de confianza es crucial a la hora de comprar tubos láser de calidad. Los tubos láser de repuesto son vendidos por una gran variedad de proveedores, tanto en línea como a través de minoristas especializados. Los proveedores consolidados, como Cloudray, ofrecen un servicio de atención al cliente fiable y garantías de producto, lo que le garantiza la mejor relación calidad-precio. Las opiniones y los testimonios de los clientes pueden ayudar a calibrar la fiabilidad de un proveedor. Los tubos láser de la serie X empiezan por $405.45, lo que ofrece una gama de opciones para diferentes presupuestos.
Compare precios entre varios proveedores para asegurarse de obtener la mejor oferta. Investiga a fondo para encontrar tubos láser de alta calidad que se ajusten a tus necesidades y presupuesto.
Resumen
Sustitución de su Tubo láser de CO2 no tiene por qué ser una tarea desalentadora. Reconociendo los signos de un tubo defectuoso, seleccionando el recambio adecuado y siguiendo un proceso detallado de instalación y prueba, puede asegurarse de que su máquina láser funcione a pleno rendimiento. Un mantenimiento adecuado y la elección de proveedores de confianza aumentarán aún más la longevidad y el rendimiento de sus tubos láser.
Preguntas frecuentes
¿Cuáles son los signos de que mi tubo láser necesita ser sustituido?
Si experimenta dificultades en el corte y un rayo láser débil o incoherente, son señales claras de que su tubo láser necesita ser sustituido. Además, tenga en cuenta que la calidad del grabado se reduce y que se producen fallos de encendido con frecuencia.
¿Cómo elijo el tubo láser de recambio adecuado?
Para elegir el tubo láser de repuesto adecuado, asegúrese de que es compatible con su cortadora láser consultando las recomendaciones del fabricante y mida el espacio disponible para confirmar que encaja correctamente. Opte por tubos con postes en forma de espárrago para facilitar la soldadura durante la instalación.
¿Qué herramientas necesito para sustituir un tubo láser?
Para sustituir un tubo láser, necesitarás un cuchillo de manualidades, un soldador, destornilladores, pelacables y cortaalambres. Tener estas herramientas a mano garantizará un proceso de sustitución más sencillo.
¿Cómo alineo mi nuevo tubo láser después de la instalación?
Para alinear su nuevo tubo láser, céntrese en el ajuste de los espejos mediante tornillos de mariposa y asegúrese de que la alineación del campo lejano y del haz vertical es correcta. Realice una prueba de baja potencia para verificar la alineación antes de proceder con las operaciones de alta potencia.
¿Dónde puedo comprar tubos láser de calidad?
Puede comprar tubos láser de calidad a proveedores reputados como Cloudray, que ofrece un servicio de atención al cliente fiable y garantías de producto. Es aconsejable consultar las opiniones de los clientes y comparar precios entre varios proveedores para asegurarse la mejor oferta.